[ad_1]
10. Sibilance
Cheap condenser microphones, poor recording techniques, and wispy vocal performances can lead to harsh high-frequency transients called sibilance. Words containing the letter “s” tend to contain sibilance.
You can reduce the effects of sibilance when tracking vocals by setting up your microphone off-axis so that it’s not directly in front of your vocalist’s mouth. Recording with a pop filter helps tame low-end transients (plosives) by absorbing bursts of air but this does almost nothing to tame sibilance.
Sometimes sibilance will make its way into your recordings or you’ll be handed vocal stems containing sibilance. The easiest way to deal with sibilance is using a de-esser plugin like Waves’ Sibilance.

It provides smooth, glitch-free removal of harsh “s” sounds by separating the offending frequency range using Waves’ Organic ReSynthesis technology. The problematic frequency range is reduced in level, leaving the rest of the vocal unaffected.
Waves’ Sibilance is easy to use. The four primary controls include a Detection knob, Threshold knob, Mode knob, and Range slider. There’s also a sibilance detection graph that helps you visualize the gain reduction applied.
9. Waves Tune
Waves Tune is the Waves equivalent of pitch correction software like Antares’ Auto-Tune Pro. It allows you to fix pitch imperfections in vocal performances. Most vocalists can benefit from a little bit of pitch correction, whether you’re going for a natural sound or hard-tuned robotic effect.

To use Waves Tune, navigate to the Segmentation section and select the root note of the key that you’re working in from the Root dropdown menu. Then, select the scale (major or minor) that you’d like Waves Tune to use as a reference for note quantization. At this points, notes will snap to the key of your song.
You can dial in the sound of the pitch correction applied further. The Speed knob adjusts the speed at which pitch correction is applied. Lower values will deliver a faster pitch quantization effect on sustained notes. To control the correction speed between one note to another, adjust the Note Transition knob. Finally, the Ratio knob affects the intensity of pitch correction applied.
There are more advanced controls that you can use to fine-tune the sound of processing applied. The Graphic Tools section allow you to navigate the Edit Window and apply processing to individual notes. For example, you can manually adjust the pitch of a single note and separate notes.
If you can get past the dated GUI, Waves Tune delivers strong pitch correction abilities. Like most pitch correction software, there’s a slight learning curve. Spend some time getting a handle on Waves Tune for best results.
Waves Tune is typically on sale for around $35 while Auto-Tune Pro costs a whopping $399. For producers on a budget that are using a DAW without a built-in pitch correction effect, Waves Tune is a great option.
8. SSL G-Master Buss Compressor
The Waves SSL G-Master Buss Compressor provides clear, punchy, and snappy compression. It’s great for acoustic, pop, EDM, and country vocals. This plugin is based on the master buss center compressor of the SSL 4000 G console, which has become a renowned piece of hardware.

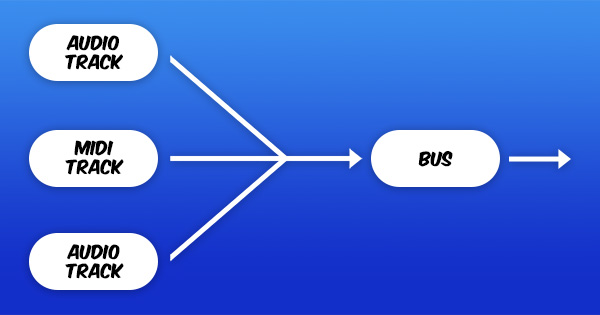
Commonly, the SSL G-Master Buss Compressor is found in mastering chains and used to “glue mixes” together. Although, you can also use it on sub-mixes like your vocal bus to provide grouped elements with a sense of “togetherness”.
This is a voltage controlled amplifier (VCA) compressor, which is one of the most common types of compressors you’ll come across. Generally speaking, VCA compressors provide a precise level of control and a sound that’s predictable and clean; the SSL G-Master Buss Compressor is the epitome of a VCA compressor which is one of the reasons it’s so popular.
In the following video, I demonstrate how to use the SSL G-Master Buss Compressor to control the level of vocals. If you never know which settings to use when compressing vocals, this video is a great resource.
7. CLA-76 Compressor / Limiter
The CLA-76 Compressor / Limiter is inspired by a famous Class A line-level limiting amplifier from the mid 1960s. For licensing reasons, Waves can’t say this but the name and GUI imply that it’s an 1176 compressor emulation.

You can set a superfast attack time on the CLA-76, making it a great choice for aggressive transient control. When you set a fast attack time using this plugin, it’s prone to pleasant distortion that suits rap and metal vocals well. These characteristics also make the CLA-76 an excellent drum compressor.
There’s modeled preamp distortion that can provide additional edginess, in addition to an “ALL” option that recreates the sound of the original hardware unit’s “All-Ratio-Buttons-In” mode. Imagine an elephant sitting down on a Fisher Price car — that’s what “ALL” mode sounds like. You can apply this effect in parallel to both your vocal bus and drum bus.
The CLA-76 can be toggled between a “Bluey” and “Blacky” mode. According to this Loopmasters article, “The major differences between the two compressors are most easily perceived in levels of distortion and noise. ‘Bluey’ distorts more easily than its counterpart, yet has a lower level of hiss than ‘Blackie’ when the analog section is engaged. Conversely, the 50-60 Hz hum is virtually inaudible in ‘Blacky.'”
6. API 550A Equalizer
The API 550A is a three-band equalizer with five fixed cutoff points per band that provides a focused sound. It’s great for sculpting the tone of vocals. You can individually toggle the high and low bands between a peak mode and shelving mode, allowing you to roll off low-end rumble and harsh high-frequency content.

Each filter’s bandwidth narrows as you increase or decrease the gain applied, leading to musical results. It’s possible to boost or cut up to 12 dB per band in 2-3 dB steps, which is more than enough for shaping vocals.
One of the things I like about this plugin is that it’s not visual; you need to rely on your ears. Plugins like FabFilter’s Pro-Q 3 provide surgical control, plenty of visual feedback, and tons of advanced features but this can overcomplicate things.
Unlimited options can hinder your workflow but there are only three bands that you need to deal with when using the 550A. To make things even easier, each band provides just four frequencies to choose from.
Boost the gain of a band and toggle through the available frequency options until you find the characteristic you’re looking for. Then, reduce the level of the band to taste and move onto the next band. You can dial in perfect EQ settings in seconds using this method.
5. Abbey Road Saturator
Saturation can help turn a thin and brittle vocal recording into a rich and radiating performance. The Waves Abbey Road Saturator provides the sound of classic tubes and transistors. You can use it to add warmth and harmonics to vocals, acoustic guitar, drums, and more.

The plugin’s EMI TG12321 Compander excites the input signal, pre-saturation, resulting in an airy high-frequency emphasis will make pop vocals shine. You can use the Abbey Road Saturator to help both vocals and instruments cut through your mix.
Once your signal runs through the EMI TG12321, you can choose to route it through either a REDD or TG console chain based on the saturation behavior that you’re looking for. There’s also a pre-compander EQ that lets you adjust the tone of the signal running into the compander, and a post-saturation EQ that you can use to fine-tune the final sound.
The Abbey Road Saturator is easy to use and provides a unique processing chain that accommodates vocals well. It delivers everything from subtle harmonic enhancement to extreme distortion effects.
4. H-Reverb Hybrid Reverb
The H-Reverb Hybrid Reverb supplies lush, spacious, and warm reverberation effects that are perfect for processing vocals. It includes a collection of halls, rooms, plates, and nonlinear reverb presets, in addition to some advanced processing options.

You have access to basic reverb controls like pre-delay, size, decay time (Reverb Time), dry/wet, etc. There are also some unique modules that include Decay Envelope, Input Echoes, Output Echoes, and Dynamics that allow you to shape decay time, introduce echoes to your reverb, and apply compression to duck the wet signal out of the way for the dry signal.
There’s a built-in EQ that lets you cut muddy low-end frequencies and remove top-end brightness. Cutting your reverb around 500 Hz and rolling off top-end near 2,500 Hz can help place your reverb in a controlled space.
H-Reverb’s Damping section can be used to set different decay times across the frequency spectrum. The Envelope and LFO sections apply sweeping filter effects to your reverb over time. Envelope sets the sweep speed as a percentage of the reverb time and LFO sets the sweep speed using a rate control.
Lastly, there’s a Modulation section that you can use to apply amplitude modulation to your input signal and introduce frequency modulation to Hybrid Reverb’s output signal. Hybrid Reverb is a big step up from most stock reverbs.
3. H-Delay Hybrid Delay
I’m a big fan of H-Delay Hybrid Delay because it’s simple to operate, which is exactly what I’m looking for when applying delay to vocals. Typically, I like to add a 1/4 note or 1/8th note delay, while cutting away some low-end and top-end for clarity; H-Delay has a built-in filter section so it’s easy to do this.

There’s also a modulation section that you can use to add wobbling pitch effects to your vocal delays. In moderation, this effect can add movement and life to your mixes.
The Delay knob changes the rate at which echoes are generated. In BPM and Host mode, you can select a note value delay time, while in MS mode you can set a delay time in milliseconds. The Feedback knob dictates how many echoes get generated over time.
Each Analog mode provides a slightly different character so try them out to find the one that fits your song the best. There’s also a LoFi button that will apply a filtered LoFi style effect to your delays if you’re looking for a worn out old school sound.
2. Retro Fi
Retro Fi is marketed as the “ultimate lofi FX chain, with everything you need to produce authentic lofi textures, warm analog sounds, and mesmerizing nostalgic vibes.” Truthfully, this is one of Waves’ greater accomplishments. Retro Fi does exactly what it claims to do.

You can use Retro Fi to achieve vintage cassette tones. It allows you to add the sound of deep vinyl grooves to your music. There’s also a palette of lofi noises, spaces, devices, and textures that will send your vocals back in time.
Retro Fi gives you access to two independent wow and wobble engines that are capable of emulating the sound of worn tape and vinyl records. There are selectable analog device impulse responses that result in versatile analog tones.
This plugin also comes with built-in reverb and echo effects, along with an era-specific 50s/60s/70s/80s Styler. The Squash control provides colorful upwards and downwards compression that you can use to control the dynamic range of vocals.
Within the Master section, there are high-pass and low-pass filters as well as a Mono slimmer. If your vocals feel too clean and modern, Retro Fi will help infuse them with the vibe and style of vocal recordings from the past.
1. oVox
Waves’ oVox is undoubtedly the most unique plugin on this list; it’s a voice-controlled synth and vocal effects processor. It allows you to turn your voice into basses, drums, guitars, keys, and synths. You can also use it to create vocal morphing, tuning, harmonizing, vocoder, talkbox, and arpeggiation effects.

This plugin has a built-in 8-voice synth, 9 customizable LFOs/Sequencer, ADSR and ORS modulators. There are also 6 modulatable effects that include AutoPan, Chorus, Comp, Delay, Distortion, and Reverb. On top of that, you have access to a fully modulatable 4-band EQ.
You can use oVox either as a real-time plugin or standalone program. It pairs particularly well with Ableton’s live performance capabilities. To learn how to use oVox to create classic vocoding effects, check out the following video.
If you found this article helpful, please consider making a donation to Black Ghost Audio. These donations help fund the creation of educational music production content like articles and videos. Thanks for reading!
[ad_2]
Source link